Linux/Unix CLI commands
APT
Remove a PPA repository
sudo add-apt-repository -r $repo_nameor
sudo rm -i /etc/apt/sources.list.d/$repo_name.listFind out which package provides the given file
apt-file search <file_absolute_path>List files in a package
apt-file list $packageList installed packages
apt list --installedList a specific package
apt list -a $package_nameSearch packages by name using wildcard
dpkg -l $name_pattern
# e.g. dpkg -l "php8*"
ag
-
By default, only searches text files
ag - Search for a pattern in files with the specified file name pattern
ag $pattern -G $file_name_patternag - List files matching a name pattern
ag -g $file_name_pattern $start_directoryag - List all file types
ag --list-file-typesag - List files with matches without printing the matching lines
ag -l $patternat
Get an overview of the pending jobs for the current user
atqor
at -lalternatives
- All
alternativessymbolic links are under/etc/alternatives.
Display details about an alternative
alternatives --display $name
# e.g. alternatives --display java
Interactively select an alternative
alternatives --config $nameList all alternatives
alternatives --listSet an alternative
sudo alternatives --set $name <command>Choose an alternative from list
sudo update-alternatives --config javaawk
Print all users name and UID
awk -F: '{ printf("%5s %s\n", $3, $1) }' /etc/passwd | sort -nChange text to lowercase (awk)
echo 'text' | awk '{print toupper($0)}'base64
Encode text to base64 format
echo -n 'hello' | base64or
echo -n 'hello' | openssl enc -aEncode a text file to base64 format
base64 $input_file > $output_fileEncode without line breaks
This can be used to avoid cross-platform issues
echo -n 'hello' | base64 -w0Decode text from base64 format
-
%at the end of decoded text means the text doesn't end with a new line -
Example
echo -n 'YWRtaW4=' | base64 -dor
openssl base64 -d <<< 'YWRtaW4='
basename
Get the file name from full path
basename -- $file_path# e.g.
basename -- /home/user_vf/Downloads/abc.txt
> abc.txtGet the file extension
# Works in shell script
local filename=README.md
extension="${filename##*.}"
echo $extension
> md
Get the file name without extension
basename $file | cut -f 1 -d '.'or
# Works in shell script
local filename=README.md
filename_without_ext="${filename%.*}"
echo $filename_without_ext
Get the name of the current directory
basename $PWDbg
Move a running job to background
-
Ctrl + Z: Suspends the running job -
bg %<JOB_ID>: Resume the suspended job in backgroundJob IDis the sequence number, not thePID -
Use
jobs -lto check job status
busybox
-
sh (ash)
-
Range not supported, must use enums or
seqsh -c "for i in 1 2 3 4 5 6 7 8 9 10; do echo \"Welcome \$i times\"; done"sh -c "for i in \$(seq 1 10); do echo \"Welcome \$i times\"; done"
-
cat
Show non-printing symbols
cat -e package.jsonInput multi-line string in shell
# Input 'EOF' to end
❯ cat <<EOF > build-image.sh
heredoc> docker build -t playground-messaging-service:0.1 .
heredoc> EOF-
Resources
chage
Show account aging info
sudo chage -l $usernamechattr
Make a file or directory immutable to changes and deletion, even by superuser
chattr +i $path_to_file_or_directoryMake a file or directory mutable to changes and deletion
chattr -i $path_to_file_or_directorychmod
-
Resources
-
SUID,SGID, andSticky bitSticky bit: a file or folder created inside a sticky bit-enabled folder could only be deleted by the creator itselfSUID: the executable which has the SUID set runs with the ownership of the program owner. That is, if you own an executable, and another person issues the executable, then it runs with your permission and not his. The default is that a program runs with the ownership of the person executing the binary.SGID: The SGID bit is the same as of SUID, only the case is that it runs with the permission of the group. Another use is it can be set on folders, making any files or folders created inside the SGID set folder to have a common group ownership.SUID,SGIDandSticky bituse the first byte of the permission, i.e. X644SUIDonly work on files, whileSGIDwork on both files and directories.- You can only apply the sticky bit to directories.
- If the “s“, “g“, or “t” indicators appear in uppercase, the executable bit (x) hasn’t been set.
Update permissions of all target directories, excluding files
-
find <directory> -type d -exec chmod <mode/octal-mode> -- {} ++sign is expanded by find to the list of the file paths (or part of it, if too long).--indicates the end of command line options. This prevents a file starting with a hyphen from being interpreted as a command line option as it would come after the--.
Display verbose log to confirm the permission changes
chmod -v <mode/octal-mode> <file...>Add SUID
sudo chmod u+s $file_or_directoryFind files with SUID set
find $directory -perm /1000Add SGID
sudo chmod g+s $directoryFind files with SGID set
find $directory -perm /2000chsh
Change login shell for the current user
chsh -s $full_path_of_shellcmp
Compare 2 text files
No output means 2 files are identical
cmp $file1 $file2Compare 2 binary files
# '-l' flag shows the byte offset and byte value of the differing bytes
# '-b' flag shows the ASCII representation of those bytes
cmp -l -b $file1 $file2
conntrack
- Cloudflare Blog - Conntrack tales - one thousand and one flows (opens in a new tab)
- Fedora Magazine - Network address translation part 2 – the conntrack tool (opens in a new tab)
- ArthurChiao's Blog - Connection Tracking (conntrack): Design and Implementation Inside Linux Kernel (opens in a new tab)
List all connections
sudo conntrack -Lcp
Copy file(s) preserving attributes
# Default attribute list: `mode,ownership,timestamps`
cp -p / --preserve ...
# Specific attributes
cp -p=mode ...csplit
curl
-
Notes
http://can be omittedGETis the default HTTP method, so it can be omitted80is the default port for HTTP, so it can be omitted
-
README - Everything curl (opens in a new tab)
Enhance your understanding of HTTP protocol with detailed explanations on HTTP headers
Show HTTP response headers only
curl -I $URLSpecify HTTP method for the request
curl -X $HTTP_METHOD $URLDownload HTTP response as a file with specified name
curl -o $FILE_NAME $URLFollow URL and redirection if any, and download HTTP response as a file keeping original name
curl -OL $URLSend HTTPS requests without verification
This will skip verifying the remote certificate.
curl -k $URLSend HTTPS requests with verification by the specified CA certificate
curl --cacert $URLSend raw text via Telnet
curl telnet://$host:$port <<< "GET / HTTP/1.1"Upload a file using POST method
curl -F "file=@${file_path}" $URLUse a HTTP proxy server
# HTTP proxy
export http_proxy=http://$proxy_ip:$proxy_port
# HTTPS proxy
export https_proxy=https://$proxy_ip:$proxy_port
# e.g.
# avsc.tar.gz is under the current directory
# POST method is inferred, so it can be omitted
curl -F "file=@avsc.tar.gz" localhost:8080/uploaddate
Convert Epoch seconds to a date
# e.g. `date -d @1682924719`
date -d @$SECONDS_SINCE_THE_EPOCH
Convert a date to Epoch seconds
# e.g. `date -d "2021-09-28 10:00:00" +%s`
date -d $date +%s
Convert a date to Epoch milliseconds
# e.g. `date -d "2021-09-28 10:00:00" +%s%3N`
date -d $date +%s%3N
Get current date and time in UTC without space or special characters
date -u +"%Y%m%dT%H%M%SZ"Get current date and time in ISO-8601 format with the specified precision
date -Ihours
> 2024-08-15T22+10:00
date -Iminutes
> 2024-08-15T22:11+10:00date -Iseconds
> 2024-08-15T22:09:58+10:00date -Ins
> 2024-08-15T22:10:33,245135536+10:00delv
Show entire DNSSEC validation chain
delv @$nameserver $domain +vtracedf
-
Alternative
diff
Compare 2 text files side by side
diff -y $file1 $file2diff - Compare 2 text files and report even when the files are identical
diff -s $file1 $file2diff - Compare 2 binary files and report even when the files are identical
diff -s $file1 $file2dig
-
Resources
Show detailed answer of a domain for all record types
dig $domain +noall +answer ANYReverse DNS lookup by IP address
dig +noall +answer -x $IPor
nslookup -type=ptr $IPShow name servers of a domain
dig NS/ns $domainSet default options for dig command
vim ~/.digrc+noall
+answerdircolors
Print default color codes
dircolors -p-
Resources
dirname
Get the parent directory of the given path
dirname $pathdnf / yum
Display details about a package
dnf info $package_nameList installed packages (RPM)
dnf list installedor
yum list installedList dependencies of a package
# with yum-utils
repoquery --requires --resolve $package_name

# with DNF
dnf repoquery --requires --resolve $package_name
Find which packages containing files matching the given pattern
dnf provides "*/${file_name}"# e.g. Look for missing header file:
dnf provides "*/sd-daemon.h"
# e.g. Look for executable:
dnf provides "*/bin/pgbench"or
yum provides "*/${file_name}"Install local RPM package
dnf install "${package_name.rpm}"or
yum localinstall "${package_name.rpm}"Install a package from a specific repo
dnf install ${package_name} --repo ${repo_id}List files in a package (RPM)
dnf repoquery -l ${package_name}or
sudo yum install yum-utils

repoquery -l $package_name
or
rpm -ql $package_nameAdd a repo
- Create a text file with
.repoextension, with the format specified in Setting [repository] Options (opens in a new tab) - Copy the
.repofile to/etc/yum.repos.d sudo dnf config-manager --add-repo /etc/yum.repos.d/"$filename.repo"
Remove a repo (RPM)
sudo rm /etc/yum.repos.d/"$file_name.repo"List enabled repos (RPM)
dnf repolist --enabledList disabled repos (RPM)
dnf repolist --disabledDisable a repo (RPM)
sudo dnf config-manager --set-disabled $repo_idEnable a repo (RPM)
sudo dnf config-manager --set-enabled $repo_idShow which repo is defined in which .repo file (RPM)
grep -E "^\[.*]" /etc/yum.repos.d/*Using modules in Fedora
dpkg
-
Unmet dependencies cannot be installed due to conflicting installed package, and
aptcannot install or remove anything- Use
dpkgto uninstall referencing packages:dpkg -r <PACKAGE> - Now
aptcan install again - Remove the conflicting installed package
- Install the desired package
- Use
List files of the specified deb file
dpkg --contents <deb_file>
List files of the installed package
dpkg -L <package_name>
Find out which package provides the given file (dpkg)
-
dpkg-query -S <file_absolute_path>or
-
dpkg -S <file_absolute_path>e.g.
dpkg -S /usr/bin/pip3
du
By default, current directory is specified implicitly.
-
Alternative
Disk usage of all directories directly under the current directory, excluding files
du -d1or
du -d 1Disk usage of all files recursively, excluding directories (can be used to find out the biggest files)
find . -type f -exec du -ha {} + | sort -h | lessethtool
Show network interface info
sudo ethtool $interfacefd
Note: use -u to include all files
fd - Search files by extension
fd -u -e $extensionfd - Search files by size
# Search file with the specified size
fd -u -t f -S $size
# Search file with the size larger than the specified size
fd -u -t f -S +$size# Search file with the size smaller than the specified size
fd -u -t f -S -$sizefd - Search files with the given pattern
fd -u $patternfd - Execute command for each match
# e.g.
fd -e $extension -x cp {} .-
Placeholder syntax
The
-xand-Xoptions take a command template as a series of arguments (instead of a single string). If you want to add additional options tofdafter the command template, you can terminate it with a\;.The syntax for generating commands is similar to that of
GNU Parallel:{}: A placeholder token that will be replaced with the path of the search result (documents/images/party.jpg).{.}: Like{}, but without the file extension (documents/images/party).{/}: A placeholder that will be replaced by the basename of the search result (party.jpg).{//}: The parent of the discovered path (documents/images).{/.}: The basename, with the extension removed (party).
If you do not include a placeholder,
fdautomatically adds a{}at the end.
fdisk
Identify USB drive name
sudo fdisk -l
fg
Bring a specific job to the foreground
fg <job-command>
file
Check file type as well as line separator
$ file vividfire-wiki.iml
vividfire-wiki.iml: XML 1.0 document, ASCII text, with CRLF line terminators
find
{} is called a placeholder. This placeholder will hold the result found by find.
Follow symbolic links: -L flag
Example:
find -L $directory -type f -iname "*.log"Sensitive/insensitive name: -name/-iname flag
Example:
find $directory -type f -name "*.log"List all direct children under the specified directory
List all directories under the specified directory
find $directory -maxdepth 1 -mindepth 1 -type dList all files under the specified directory
find $directory -maxdepth 1 -mindepth 1 -type fGet files with the given user
> find $directory -user $username
# or
> find $directory -uid $uid
Get files with the given group
find $directory -group $groupnameor
find $directory -gid $gidGet files modified in the last n min
find $directory -mmin -$n -type f# e.g.
find . -mmin -5 -type fExecute a command for each match
-
find <file-pattern> -exec <command> {} \;e.g.
find . -type f -exec file {} \;
Execute a command with all matches
find $file_pattern -exec $command {} +Example:
find . -type f -exec file {} +# Output
./PostgreSQL.md: UTF-8 Unicode text
./Prawn-leek-spaghetti/prawn-leek-spaghetti-83115-1.jpeg: JPEG image data, progressive, precision 8, 720x480, components 3
./Accounting.md: UTF-8 Unicode text
./Apache-Kafka.md: UTF-8 Unicode text, with very long lines
./Kubernetes.md: UTF-8 Unicode text, with very long lines
./Microsoft-Azure.md: UTF-8 Unicode textfind - Search files by size
-
Search files with the specified size
find . -type f -size $size -
Search files with the size larger than the specified size
find . -type f -size +$size -
Search files with the size smaller than the specified size
find . -type f -size -$size
find,sed - Replace text in files
find . -type f -name '$file_pattern' -readable -writable -exec sed -n 's/$from_pattern/$to_pattern/gp' {} \;Dry run search and replace
find . -type f -name '$file_pattern' -readable -writable -exec sed -i 's/$from_pattern/$to_pattern/gp' {} \;Use -i to replace text in place
findmnt
List mount point of a device
findmnt $device# Example:
findmnt /dev/sdb1firewalld
-
Frontend for managing
Netfilterrules -
Zones
-
A
zonedefines the trust level for ainterface. -
A
interfacecan be assigned to only onezoneat a time. -
A
zonecan be used by manyinterfaces. -
If an
interfaceis not assigned to anyzone, it will be assigned to thedefaultzone. -
Predefined zones, from the least trusted to the most trusted
-
dropThe most untrusted zone. All incoming connections are dropped without reply and only outgoing connections are possible.
-
blockSimilar to the above, but instead of simply dropping connections, incoming requests are rejected with an
icmp-host-prohibitedoricmp6-adm-prohibitedmessage. -
publicRepresents public, untrusted networks. You don’t trust other computers but may allow selected incoming connections on a case-by-case basis.
-
externalExternal networks in the event that you are using the firewall as your gateway. It is configured for
NATmasquerading so that your internal network remains private but reachable. -
dmzUsed for computers located in a
DMZ(isolated computers that will not have access to the rest of your network). Only certain incoming connections are allowed. -
workUsed for work machines. Trust most of the computers in the network. A few more services might be allowed.
-
homeA home environment. It generally implies that you trust most of the other computers and that a few more services will be accepted.
-
internalThe other side of the external zone, used for the internal portion of a gateway. The computers are fairly trustworthy and some additional services are available.
-
trustedTrust all of the machines in the network. The most open of the available options and should be used sparingly.
-
-
-
Services
-
A service is a predefined list of local ports, destinations, or firewall helper modules.
-
Built-in services are defined in
/usr/lib/firewalld/services -
Custom services are defined in
/etc/firewalld/services
-
-
ICMP types
firewalldcan use the predefinedICMPtypes to limit how much diagnostic information a system provides to potentially hostile systems.
-
Resources
firewalld - List all zones
firewall-cmd --get-zones | tr " " "\n" | sortfirewalld - List all active zones
Output shows the active zones and assigned interfaces
$ firewall-cmd --get-active-zones
FedoraServer (default)
  interfaces: enp2s0
docker
  interfaces: br-cf3c17e668e9 br-f40f08285ab2 docker0
firewalld - Get information of a single zone
$ sudo firewall-cmd --zone=$zone --list-all
FedoraServer (active)
  target: default
  icmp-block-inversion: no
  interfaces: enp2s0
  sources:
  services: actualbudget cockpit dhcpv6-client jellyfin ssh
  ports:
  protocols:
  forward: yes
  masquerade: no
  forward-ports:
  source-ports:
  icmp-blocks:
  rich rules:
firewalld - Get all services
firewall-cmd --get-services | tr " " "\n" | sortNote:
-
Output includes both predefined and custom services
-
Custom service definition files are under /usr/lib/firewalld/services
firewalld - Get information of a single service
sudo firewall-cmd --info-service=$service# e.g.
> sudo firewall-cmd --info-service=Jellyfin--8096
Jellyfin--8096
ports: 8096/tcp
protocols:
source-ports:
modules:
destination:
includes:
helpers:firewalld - Add a new custom service
sudo firewall-cmd --permanent --new-service-from-file=${service.xml} --name=$service_nameExample
-
Create a file called
actualbudget.xmlin/etc/firewalld/servicesfolder with the following content.<?xml version="1.0" encoding="utf-8"?> <service> <description>actualbudget</description> <port port="5006" protocol="tcp"/> </service> -
Add new service rules
# File will be copied to /etc/firewalld/services with correct permissions sudo firewall-cmd --permanent --new-service-from-file=actualbudget.xml --name=actualbudget -
Enable traffic for the service permanently
# Add the service to a public zone to enable traffic
sudo firewall-cmd --permanent --zone=FedoraServer --add-service=actualbudget

sudo firewall-cmd --reload
firewalld - Remove a service from a zone
sudo firewall-cmd --zone=$zone --remove-service=$servicefirewalld - Allow HTTP traffic temporarily (revert after service restart)
sudo firewall-cmd --zone=$zone --add-service=$servicefirewalld - Allow HTTP traffic permanently (stay effective after service restart)
Make changes without --permanent flag for experimental purposes
sudo firewall-cmd --zone=$zone --add-service=$service --permanentfirewalld - Configure an existing service
fw --permanent --service=myservice --set-description=description
fw --permanent --service=myservice --set-short=description
fw --permanent --service=myservice --add-port=portid[-portid]/protocol
fw --permanent --service=myservice --add-protocol=protocol
fw --permanent --service=myservice --add-source-port=portid[-portid]/protocol
fw --permanent --service=myservice --add-module=module
fw --permanent --service=myservice --set-destination=ipv:address[/mask]
or
Edit the service file directly
# user-defined service
sudo vim /etc/firewalld/services/$service.xml
# predefined service
sudo vim /usr/lib/firewalld/services/$service.xml
firewalld - Save runtime changes to permanent
sudo firewall-cmd --runtime-to-permanentfirewalld - Reload firewall configuration
sudo firewall-cmd --reloadfirewalld - Check if a service is allowed in a zone
sudo firewall-cmd --zone=$zone --query-service=$service# e.g.
sudo firewall-cmd --zone=FedoraServer --query-service=sshfirewalld - Check if a port is allowed in a zone
sudo firewall-cmd --zone=$zone --query-port=$port# e.g.
sudo firewall-cmd --zone=FedoraServer --query-port=5006/tcpfirewalld - Firewall configuration with Docker containers
fzf
-
Setup
- There is an
installscript under thefzfinstallation directory, and useinstall --helpfor help.
- There is an
-
Type anything on the command line followed by
**and pressTABto triggerfzf.**is the default trigger sequence, configurable byFZF_COMPLETION_TRIGGERenvironment variable.e.g.
vim ~/path/** + <TAB>kill ** + <TAB>ssh ** + <TAB>
-
Key bindings
-
CTRL + j- Move cursor up -
CTRL + k- Move cursor down -
ALT + c- Triggersfzf, select and change to one directory under current directory -
CTRL + t- Triggersfzf, select one file under current directory -
CTRL + r- Triggersfzf, select one command from history
-
-
Resources
getent
List all users on the system
getent passwd | cut -d: -f1 | sortList all groups on the system
getent group | tr ":" "\t" | column -tor
less /etc/groupList all members of a group on the system
getent group $groupname | tr ":" "\t" | column -tgetfacl
Get ACL of the specified file
getfacl $fileExample:
# file: Python
# owner: www-data
# group: www-data
user::rwx
user:www-data:rwx
group::r-x
mask::rwx
other::r-x
default:user::rwx
default:user:www-data:rwx
default:group::r-x
default:mask::rwx
default:other::r-x
gpasswd
Add a user to a group
sudo gpasswd -a $username $groupnamegrep
-
Always use quotes to enclose regular expression, otherwise the expression has to be properly escaped.
-
Target file
grep [OPTION]... $search_pattern $file -
Target directory
grep -r [OPTION]... $search_pattern $directory
Enable Perl regular expressions, such as \d, \w and \s
grep -PDisplay matches without filtering lines without matches / Highlight matches
# Replace ${regex} with the actual regex
grep -E '${regex}|$'
Example
grep -Erw --include='*.java' 'log.info|$' .Note: must be quoted
Filter out empty lines in file
grep -E -v '^\s*$' $fileFilter out lines starting with # in file
grep -v '^#' $file...Search specified files only
Example
grep -r --include='*.java' 'search_pattern' $directorygrep variants
egrep
- extended
grep, equivalent togrep -E
fgrep
fixed-stringsearch, not recognizing anyregular expressionmeta-characters as being special, resulting in better performance, equivalent togrep -F
pgrep
List the processes whose names match a given regex
pgrep -l $regexUse -l to display program name
List the processes run by a given user
pgrep -u $usernameList the processes whose names do not match a given regex
pgrep -lv $regexrgrep
-
can recursively descend directories without using
find, resulting in much better performance. -
Resources
groupdel
Delete a group
sudo groupdel $groupnamehead / tail
Specify the number of lines, by default 10
head -10 / tail -10
hexdump
Display the content of a file in both hexadecimal and ASCII format
hexdump -C <file>
Display the first 8 bytes of a file in hexadecimal format
-
hexdump -n 8 <file>Can be used to detect file type
host
Lookup A, AAAA, and MX records of a domain
host <domain>
Reverse lookup an IP
host <IP>
Specify an alternate DNS server to query
host <domain> <DNS-server-IP>
hostname / hostnamectl
Show hostname
# Need to install `hostname` first, dnf install hostname
hostname
or
cat /etc/hostnameShow system hostname and related info
hostnamectlPermanently change host name
hostnamectl hostname $new_host_nameList all FQDNs of the machine
hostname -A | tr " " "\n" | sort
hping3
Use traceroute mode in TCP mode against the target host
hping3 -T -V $target_hostid
List all groups of the specified user
groups $usernameList all groups of the current user
groupsor
id -nGShow the primary group of the current user
id -ngipcalc
Calculate subnets from CIDR
ipcalc --all-info $CIDRGet network info from IP and netmask
ipcalc --all-info $IP $Netmaske.g. ipcalc --all-info 192.168.50.221 255.255.255.0
Can also get CIDR from this command
Output in JSON format
ipcalc -j | jqkill
Send SIGKILL to terminate a process forcibly
kill -9 $PIDSend SIGHUP to a daemon process to reload configuration
If a daemon process has a configuration file which is modified after the process has been started, there should be a way to tell that process to reload its configuration file without stopping the process. Many daemons provide this mechanism using a SIGHUP signal handler. When you want to tell the daemon to reload the config, simply send it the SIGHUP signal.
kill -1 $PIDldapsearch
Authentication with specified bind account
ldapsearch -D $bind_account -w $passwordldd
List dynamic linked libraries of an executable
ldd $executableless
less - Display color output
# Interpret color escape sequences
less -R $file
ls
customize files and directories colors
-
For linux terminal running on Windows, directories color could be unfriendly to users
-
export LS_COLORS='ow=01;36;40'bold (01) cyan (36) dir names with black (40) background
-
Only list direct directories under the specified directory
-
ls -d */Caveat: hidden directories are not included
-
find . -maxdepth 1 -mindepth 1 -type dTo include hidden directories
lsblk
Display info about filesystems
sudo lsblk -flslogins
Display all accounts in the system
lsloginsDisplay system accounts in the system
lslogins --system-accsDisplay user accounts in the system
lslogins --user-accsDisplay details about a single account
lslogins $user_namelsmod
To check if the KVM modules are enabled
If this command lists kvm_intel or kvm_amd, KVM is properly configured.
lsmod | grep kvmlsof
-
Note
-
Use
sudoif the process is started by root -
By default when you use more than one list option in lsof, they will be ORed.
Flag Description -PDo not translate port numbers-nDo not translate host names+c0Display maximum number of characters in COMMANDcolumn
-
-
Resources
Make options to be ANDed
Use -a flag, and all specified options will be effective together
lsof -U -c java -aList LISTEN TCP connections
sudo lsof -iTCP -sTCP:LISTENList ESTABLISHED TCP connections
sudo lsof -iTCP -sTCP:ESTABLISHEDList processes using the specified UDP port
sudo lsof -P -iUDP:<port>
# e.g. `sudo lsof -P -iUDP:8080`
List processes using the specified TCP port
sudo lsof -P -iTCP:<port>
# e.g. `sudo lsof -P -iTCP:8080`
List all TCP ports currently opened by the given processes
lsof -a -iTCP -p <PID1,PID2...>List all TCP ports currently opened by the given command
# $command argument is a `regex`.
lsof -a -iTCP -c $command
List all files opened by a process
lsof -p $PIDList files for processes executing the specified command
# $command argument could be a regex.
lsof -c $command
List processes using the specified file
lsof $fileList processes that are using any file under the specified directory
lsof +D $directoryList files opened by a user
lsof +u $usernameList UNIX domain sockets
lsof -Ultrace
Display dynamic library calls of a program
ltrace $programLXC/LXD
-
Installation
-
Profiles
-
Profiles are instance specific configurations, like
AWS EC2 Launch Template.Profiles - LXD documentation (opens in a new tab)
e.g.
lxc profile list
-
man
Search the short manual page descriptions for keywords and display any matches
m -k <keyword>Open another man page within a man page
-
Switch to command mode by typing
! -
Input command to open man page
man <section> <command>
mkdir
Create hierarchical directories
mkdir -pmount
-
How To Mount and Unmount Drives on Linux (opens in a new tab)
Include most recipes about mounting and unmounting drives
Lists all the file systems mounted yet
mount -l | column -t | sortList unmounted disks or partitions
The ones without mount point are unmounted.
lsblk -fMount a partition
-
sudo mount -t <file-system> <partition> <folder>e.g. Mount a
exfatdevicesudo mount -t exfat /dev/sdb1 /media/T7
netcat
Client/Server socket communications
-
Server
netcat -l <port> -
Client
-
netcat <host> <port>Send data interactively
-
echo "text" | netcat <host> <port>Send data via piping
-
Test if the specified host and TCP port is open
netcat -zv <host> <port>
Test if the specified host and TCP ports are open
-
netcat -zv <host> <port-range>e.g.
netcat -zv <host> 8000-8080
nmap
-
TCP SYNscannmap -sS <HOST_NAME/IP_ADDRESS> -p <PORT> -
TCP CONNECTscannmap -sT <HOST_NAME/IP_ADDRESS> -p <PORT> -
UDPscannmap -sU <HOST_NAME/IP_ADDRESS> -p <PORT>
Scan most common ports of a range of hosts
sudo nmap -sS --top-ports=${number-of-ports-to-scan} ${CIDR-notation}pacman
Search a package
pacman -Ss $packageList files in a package (Pacman)
pacman -Ql $packageperf
pidof
- Functions similar to
pgrep
Find the PID(s) of one or multiple running processes
pidof <program>
ps
List all processes in full format
ps -ef | lessList process(es) with specified PID(s)
ps -f $(pidof $program) | catDisplay full path of command with cat without truncating
Pretty print command line of a running process
-
With column header
ps -ocmd -p $PID | tr " " "\n" -
Add an
equal signto suppress headerps -ocmd= -p $PID | tr " " "\n"
Display environment variables along with command line
-
Use output modifier:
eps e -ww -ocmd -p $PID | tr " " "\n" > ps.log
Check if a process is attached to a terminal
ps -o tty= -p <PID>
# or just check the output of ps -ef, if tty column is empty, then it's not attached to a terminal
pv
pv - Copy a file with progress bar
pv $source_file > $destination_filepv - Compress a file with progress bar
pv $source_file | zstd > $destination_filereadelf
Display headers of ELF files
readelf -h <ELF-file>readlink
Get the absolute path of the file the specified file/symlink
-
readlink -f <file/symlink>If
fileis a symlink, output will be the path of the file the symlink points to, otherwise it would just be the absolute path of the file.
rename
Rename files with a regex
rename 's/<regex>/<replacement>/' <file-pattern>repoquery
resolvectl
Check the DNS currently in use by systemd-resolved
resolvectl statusDisplay DNS per network interface
resolvectl dnsripgrep
Search pattern in files based on file extension
rga "$pattern" --glob "*.$file_ext"Example:
rga "java" --glob "*.epub"rpm
List imported PGP public keys
rpm -qa gpg-pubkeyFind which installed packages containing local files matching the given pattern
rpm -qf $local_fileDisplay information of a PGP public key
rpm -qi $key_ide.g. rpm -qi gpg-pubkey-98ab5139-4bf2d0b0
Remove an imported PGP public key
sudo rpm -e $key_ide.g. sudo rpm -e gpg-pubkey-98ab5139-4bf2d0b0
rpm2cpio
Extract files from a RPM package
rpm2cpio $rpm_file | cpio -idmvscp
Copy a Local File to a Remote System with the scp Command
scp $local_file $remote_user@$host_ip:$remote_pathCopy a file from remote
scp $remote_user@$host_ip:$remote_path $local_pathsed
Filter out empty lines in file (sed)
sed '/^\s*$/d' $fileUse Extended Regular Expression (ERE) in sed
sed -E 's/<from-pattern>/<to-pattern>/g' $fileReplace text in place in a file
sed -i 's/<from-pattern>/<to-pattern>/g' $fileOnly print lines that match the pattern
-n supporess the default output, and p prints the matched lines.
sed -n 's/<from_pattern>/<to_pattern>/p' $filee.g.
$ sed -n 's@3.8.2@3.10.4@p' pom.xml
        <gatling-charts-highcharts.version>3.10.4</gatling-charts-highcharts.version>
Debug sed command
sed --debug 's/<from-pattern>/<to-pattern>/g' $file | grep -B 3 -A 4 'MATCHED'e.g.
$ sed --debug 's@1.35@1.37@g' pom.xml | grep -B 3 -A 4 'MATCHED'
INPUT:   'pom.xml' line 17
PATTERN:         <jmh.version>1.35</jmh.version>
COMMAND: s/1.35/1.37/g
MATCHED REGEX REGISTERS
  regex[0] = 21-25 '1.35'
PATTERN:         <jmh.version>1.37</jmh.version>
END-OF-CYCLE:
        <jmh.version>1.37</jmh.version>
Compare changes
$ sed --debug 's@1.35@1.37@g' pom.xml | grep -B 3 -A 4 'MATCHED' | grep PATTERN
PATTERN:         <jmh.version>1.35</jmh.version>
PATTERN:         <jmh.version>1.37</jmh.version>
Apply changes to the file
$ sed -i --debug 's@1.35@1.37@g' pom.xml | grep -B 3 -A 4 'MATCHED' | grep PATTERN
PATTERN:         <jmh.version>1.35</jmh.version>
PATTERN:         <jmh.version>1.37</jmh.version>
Run sed against multiple files
sed -n 's@<from-pattern>@<to-pattern>@p' $file1 $file2More files
find $start_dir -type f -iname $file_pattern -print -exec sed -n 's@<from_pattern>@<to_pattern>@p' {} \;e.g.
$ find . -type f -iname 'pom.xml' -print -exec sed -n 's@1.35@1.37@p' {} \;
./playground.java-concurrency/vertx-concurrency/pom.xml
./spring-microservice/pom.xml
./cq-devops.admin-client/pom.xml
./playground-cryptography/pom.xml
./playground.jvm-performance/pom.xml
        <jmh.version>1.37</jmh.version>
./spring-boot-starter/pom.xml
./playground.vertx-web/pom.xml
./playground.spring-boot-cli/pom.xml
./cq-devops.aws-client/pom.xml
./project-crystal-lover.admin/pom.xml
./devops.maven/pom.xml
./project-crystal-lover.image/pom.xml
setsid
Run a command as a daemon
Closing a session will terminate all related processes for that TTY, which is not desired for system wide processes.
You must disassociate your daemon process from the terminal to avoid being sent signals related to terminal's operation (like SIGHUP when the terminal session ends as well as potentially SIGTTIN and SIGTTOU).
setsid $command > /dev/null 2>&1 < /dev/null &
# To run it as a full daemon from a shell, you'll need to use setsid and redirect its output. You can redirect the output to a logfile, or to /dev/null to discard it.

# This will completely detach the process from your current shell (stdin, stdout and stderr). If you want to keep the output in a logfile, replace the first /dev/null with your /path/to/logfile.

# You have to redirect the output, otherwise it will not run as a true daemon (it will depend on your shell to read and write output).
shar
Compress a binary file with gzip and create a shar archive
shar -z <binary-file> > <archive.sh>shc
Compile a shell script into a binary executable
shc -vrf <shell-script> -o <binary-file>sleep
Run a command after a specified time
sleep $time && $commandss
Display TCP ports opened by a process
ss -tapn | grep <PID>Show all UNIX domain sockets (LISTENING and ESTABLISHED)
ss -xanstat
Display octal file permissions
stat <file/directory>
Check what init system Linux is using
sudo stat /proc/1/exe | grep File
strace
Trace system calls and signals of a program
strace <program>
Trace system calls and signals of a running process
strace -p <PID>
strings
Display environment variables of a running process
-
Retrieve PID of a process
pidof <program>or if it's a Systemd service
systemctl status <name>.service -
Display environment variables
sudo strings /proc/<PID>/environ | sort -
Resources
SysV
List all services
service --status-allCheck status of a service
service $service_name statusStart a service
sudo service $service_name starttar
Package files into a tar archive
tar cvf $TAR_FILE $file1, $file2, $file3 ...Compress and package files into a tar archive
tar --zstd -cvf $tar_file $dir | $files_to_be_included...tar -I"zstd -19 -T0" -cvf ${file.tar.zst} ${dir} | ${files_to_be_included}...Extract files from a tar archive into the specified directory (creating the directory if it does not exist)
tar xvf $tar_file --one-top-level=$dirExtract files from a tar archive into the specified directory (without creating the directory)
tar xvf $tar_file -C $dir$dir must exist already.
List files in a tar archive
tar tvf $tar_file- When working with a
tarfile,-fmust be used to specify the file.
tcpdump
Print the list of the network interfaces available on the system and on which tcpdump can capture packets
tcpdump -D | grep ConnectedBPF filter for potentially HTTP traffic
tcpdump -i ${interface} tcp and (dst port 80 or dst port 8080 or dst port 443)Capture the packets and write into a pcap file
tcpdump -w ${pcap_file}Display the contents of a pcap file
tcpdump -r ${pcap_file}Capture packets with IP address, avoiding DNS lookp
tcpdump -nCapture packets flows on a particular port
tcpdump -i ${interface} port ${port}Capture packets for a particular destination IP and port
tcpdump -i ${interface} dst ${ip} and port ${port}Display MAC addresses on each line
tcpdump -etelnet
Test if a remote port is open
-
telnet <host> <port>Use this as a netcat alternative
timeout
Run a command with a time limit
-
timeout <time-limit> <command>The command will be stopped when the timeout is reached, useful for scheduling stopping a continuously running command.
timedatectl
Display the current system clock time
timedatectltop
-
non-interactive mode
top -b -n <iteration-count> -
Display command line
top -c -
Interactive commands
-
h: help -
z: toggle color mode -
c: toggle display of command-line -
i: toggle display of any idle or zombie processes -
o: filter criteria input -
u: user processes -
Shift + P: CPU utilization percentage from high to low -
d: change refresh intervalprocesses that have not used any CPU since the last update will not be displayed.
-
k: kill a process (SIGTERM), prompting aPID -
Interactive commands can be input at start like
top -i. -
Configuration is saved in
.toprcin home directory.
-
-
Resources
List processes with command line arguments
top -bcn1 -w512 | lesstr
- Only works with
ASCIIcharacters
Translate characters
-
e.g.
jcmd 13668 VM.command_line | tr ";" "\n" | tr " " "\n"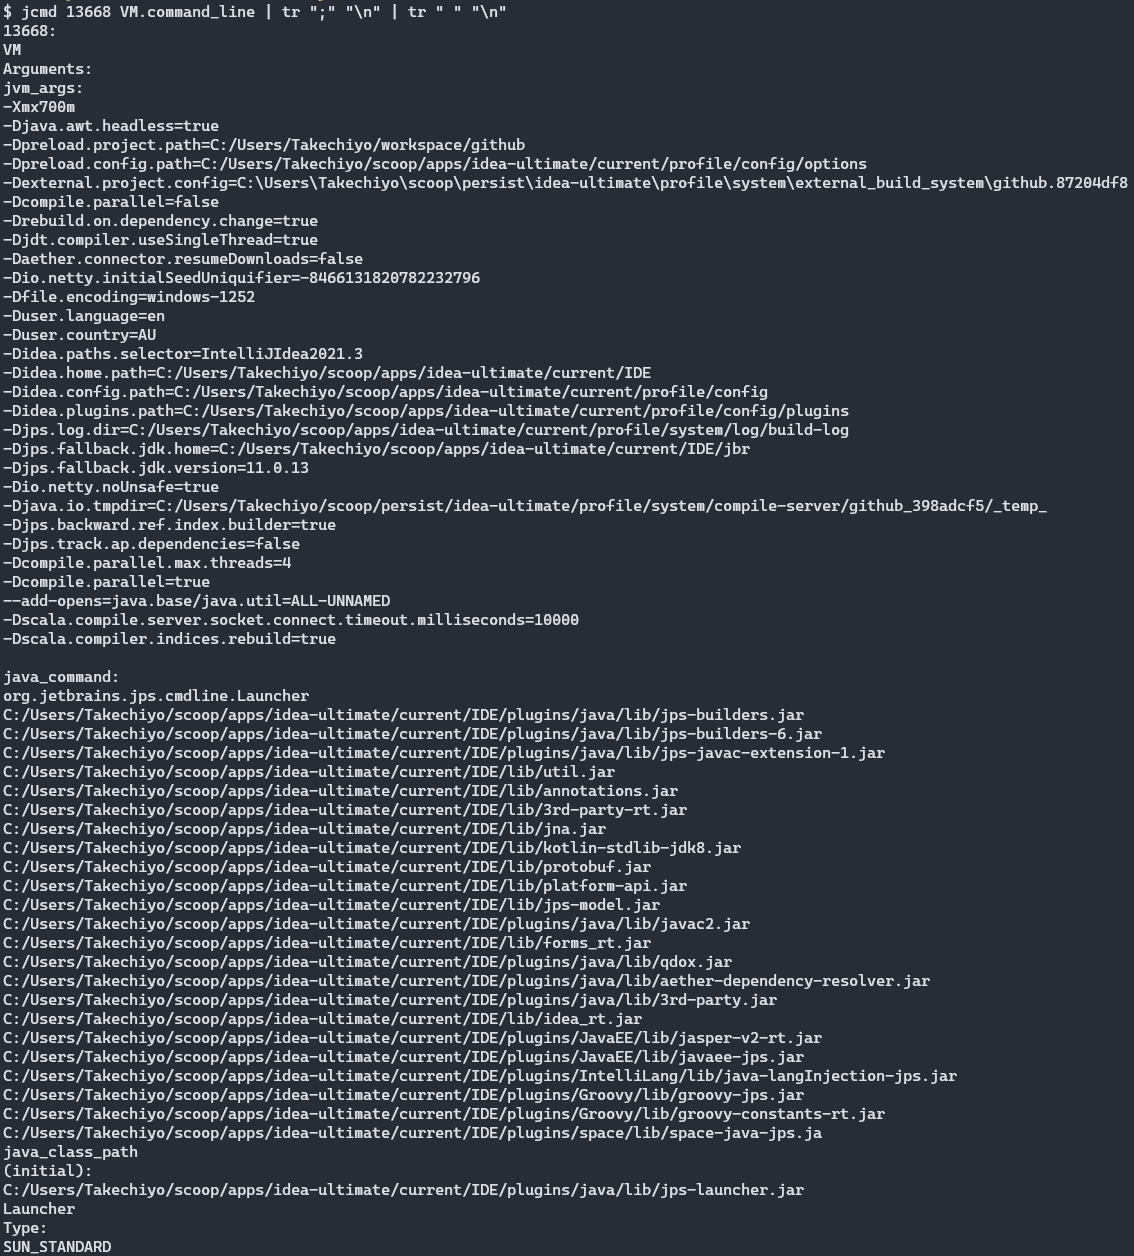
Delete characters
-
tr -d STRINGe.g.
tr -d "[:space:]"
Remove non-printable characters
tr -dc '[[:print:]]'Change text to lowercase (tr)
-
echo "movie" | tr '[:lower:]' '[:upper:]'Lower to upper
traceroute
umask
- File default permission
666, directory default permission777, and actual permission will be calculated byumask. Ifumask=022, the actual permission would be666-022=644
Set umask temporarily for the current session
# e.g. umask 022
umask $permission_sets
Show the umask of a running process
grep '^Umask:' "/proc/$(pidof <program>)/status"uniq
Compute file checksums and locate duplicates in a directory
find $target_directory -maxdepth 1 -type f -exec md5sum {} \; | uniq -w32 -Duseradd
View the current default options type
useradd -Duserdel
Delete a user and its home directory
sudo userdel -r $usernameusermod
Add a user to the given group(s)
usermod -aG <$group1,$group2...> $usernamewc
Count characters in a string
echo $STRING | wc -cwget
Download and print to stdout
-
If
-is used as file, documents will be printed tostandard output, disabling link conversion.wget -O - <URL> -
Resources
xdg-open
Open a file with associated default program from shell
xdg-open $filexmllint
Pretty print XML to stdout
xmllint --format <file> | less
Pretty print XML to file
xmllint --format <file> > <output-file>
Pretty print XML from pipe
cat $file | xmllint --format - | lessxsel
Copy content to clipboard from shell
echo -n 'can you see me?' | xsel -bzip
Archive a directory
zip -r $ZIP_FILE $DIRShow the contents of a zip file
unzip -l $ZIP_FILEzstd
Archive a directory with zstd compression
tar --zstd -cvf <filename>.tar.zst <dir> / <files-to-be-included...>Extract a zstd archive
tar --zstd -xvf <filename>.tar.zstzstd - Specify compression level
-
-#Selects
#compression level1-19(default:3)
zstd - Use multiple threads
-
-T#, --threads=#Compress using
#working threads (default:1)If
#is 0, attempt to detect and use the number of physical CPU cores.zstd -T0 $file
WSL
Access Windows executable
-
Reference executables with file extension, such as
clip.exee.g.
echo "Hello" | clip.exe
snap not working
sudo apt-get update && sudo apt-get install -yqq daemonize dbus-user-session fontconfig
sudo daemonize /usr/bin/unshare --fork --pid --mount-proc /lib/systemd/systemd --system-unit=basic.target
exec sudo nsenter -t $(pidof systemd) -a su - $LOGNAME
snap version
List distributions available to install
wsl -l -oList local installed distributions and status
wsl -l -vTurn on capability to change Windows file permissions from WSL
# In a WSL distribution, create if missing:
# /etc/wsl.conf
[automount]
options = "metadata"
Open file with associated Windows program
wslview <file>
Tools and utilities
Environment variables
-
The
envwill only display a list ofenvironment variablesthat have been exported excluding allshellvariables. -
Use
printenvcommand to for the list of allshellvariables. -
Child processescannotexportvariables back to theparent processesthat spawned them. -
setcommand (opens in a new tab)-
Options can be specified with either a leading
-(enable) or+(disable). -
set -xPrint a trace of simple commands and their arguments after they are expanded and before they are executed, useful for debugging shell script.
-
set -eExit immediately if a simple command exits with a
non-zero status. Note some exceptions apply. -
set -aEach variable or function that is created or modified is given the
exportattribute and marked forexportto the environment of subsequent commands.
-
Network
UNIX Domain Sockets
-
Resources
ip
Colorize output
ip -colorShow IP addresses assigned to all network interfaces
ip -brief a[ddr]Show all MAC addresses
ip -brief l[ink]Show routing table
ip ro[ute]nc
Port scanning to test connection
Test a TCP port or a range of ports
nc -zv $host $porte.g. nc -zv 192.168.50.250 8096
nc -zv $host $port_rangee.g. nc -zv 127.0.0.1 8080-8088
Test a UDP port or a range of ports
nc -zuv $host <port/port_range>Test connecting to a UNIX domain socket
nc -zUv $socketFile transfer
Note: transfer unencrypted
On the receiving end running:
nc -l -p $port > $out_filewill begin listening on the specified port.
On the sending end running:
nc -w 3 [destination] $port < $in_filewill connect to the receiver and begin sending file.
netstat
List local listening TCP ports
sudo netstat -tpnlList local established TCP ports
sudo netstat -tpnList all local TCP ports
sudo netstat -tpnaList all local TCP ports used by the given command
sudo netstat -tpna | grep -E "[0-9]+/${command}"# e.g. List all local TCP ports used by java
sudo netstat -tpna | grep -E '[0-9]+/java'List all processes using the given port
# Local address could be 0.0.0.0 or 127.0.0.1
sudo netstat -tpna | grep -E ":$port"
newgrp
Switch to a group
newgrp $groupnamenft
List all rules
sudo nft list rulesetnmcli
Network connection status
nmcli g/nmcli general status
Network connection list
nmcli -p con/nmcli -p connection show
Activate a connection
nmcli con up <connection-name>
Network adapters
nmcli dev/nmcli device status
Show details of a connection
nmcli con show <connection-name>
Show details of a network adapter
nmcli dev show <device-name>
Connect to a network device
sudo nmcli dev connect <device-name>
Disconnect from a network device
sudo nmcli dev disconnect <device-name>
Show connection autoconnect property
nmcli -f name,autoconnect con
Change connection autoconnect property
-
sudo nmcli con mod <connection-name> connection.autoconnect <yes/no>Modify NetworkManager connection profile autoconnect property (opens in a new tab)
Turning on/off
autoconnecteffectively enable/disable the connection. -
Resources
nmtui
nmclialternative as TUI for users unfamiliar with commands.
Install nmtui
sudo yum install NetworkManager-tuiFile permissions and attributes
User management
- Wikipedia - passwd (opens in a new tab)
- Run Command As Another User (opens in a new tab)
- Red Hat - Enable Sysadmin - Exploring the differences between sudo and su commands in Linux (opens in a new tab)
su
Switch to a user
# Requires the user password, not needed if switching from root

# With a login shell
su - $username

# Without a login shell
su $username

# If user name is omitted, switch to root user
su -
Switch to a user with nologin
sudo su - -s $target_shell $usernamesudo
sudo - list the privileges of the current user / Check if the current user can run sudo command
sudo -lsudo - list the privileges of the specified user / Check if the specified user can run sudo command
sudo -l -U $usernamesudo - use vim as the default editor for visudo command
visudocommand is the recommended way to updatesudoerscontent, as it protects against many failure modes.- If other editors are directly used to edit a
sudoerfile, usesudo visudo -cf <sudoer-file>to check syntax errors.
# Option 1
# Set default editor
export VISUAL=vim

# Use this command to open
sudo -E visudo
# Option 2
# Edit /etc/sudoers, add the following line
Defaults editor=/usr/bin/vim
# Open as usual
sudo visudosudo - enable the specified user to run the sudo command
-
Directly add entry to
/etc/sudoersby editing/etc/sudoersfile withsudo visudocommandor
-
Add a text file containing the entry to
/etc/sudoers.d# e.g. enable the current user to run `podman` with `sudo` without password echo -e "$(whoami)\tALL=(ALL)\tNOPASSWD: /usr/bin/podman" | sudo tee /etc/sudoers.d/$(whoami)
sudo - sudo group users can run sudo command by providing their password
# Open the sudoers file
sudo visudo
# Add the following line to /etc/sudoers
%sudo ALL=(ALL:ALL) ALLsudo - specify a user can run sudo without password
Typically for automation purposes
echo -e '${username}\tALL=(ALL)\tNOPASSWD:\tALL' > /etc/sudoers.d/${username}sudo - run a command as the specified user
-
sudo -u <username> <command> <arg...>Authenticate against the current user
-
su - <username> -c <command>Authenticate against the target user
sudo - switch to an interactive session as a root user
sudo -ior
sudo su -Start at the root user's home directory: /root
sudo - switch to an interactive session as a root user with the current user's environment
sudo -ssudo - switch to an interactive session as a root user with authentication against the root user
sudo su -Distro
Display Linux distribution name and version
-
/etc/*-releasecat /etc/*-releaseOutput:
Fedora release 42 (Adams) NAME="Fedora Linux" VERSION="42 (Workstation Edition)" RELEASE_TYPE=stable ID=fedora VERSION_ID=42 VERSION_CODENAME="" PLATFORM_ID="platform:f42" PRETTY_NAME="Fedora Linux 42 (Workstation Edition)" ANSI_COLOR="0;38;2;60;110;180" LOGO=fedora-logo-icon CPE_NAME="cpe:/o:fedoraproject:fedora:42" DEFAULT_HOSTNAME="fedora" HOME_URL="https://fedoraproject.org/" DOCUMENTATION_URL="https://docs.fedoraproject.org/en-US/fedora/f42/" SUPPORT_URL="https://ask.fedoraproject.org/" BUG_REPORT_URL="https://bugzilla.redhat.com/" REDHAT_BUGZILLA_PRODUCT="Fedora" REDHAT_BUGZILLA_PRODUCT_VERSION=42 REDHAT_SUPPORT_PRODUCT="Fedora" REDHAT_SUPPORT_PRODUCT_VERSION=42 SUPPORT_END=2026-05-13 VARIANT="Workstation Edition" VARIANT_ID=workstation Fedora release 42 (Adams) Fedora release 42 (Adams) -
hostnamectlhostnamectlOutput:
     Static hostname: CINUC11
         Icon name: computer-desktop
           Chassis: desktop 🖥️
        Machine ID: d990b1913b074dcd842f3a6e1d0aa656
           Boot ID: 5c202093f13a4721b4330a696773de1c
      AF_VSOCK CID: 2
  Operating System: Fedora Linux 42 (Workstation Edition)
       CPE OS Name: cpe:/o:fedoraproject:fedora:42
    OS Support End: Wed 2026-05-13
OS Support Remaining: 8month 3w 4d
            Kernel: Linux 6.15.9-201.fc42.x86_64
      Architecture: x86-64
   Hardware Vendor: Intel_R_ Client Systems
    Hardware Model: NUC11PAHi5
  Firmware Version: PATGL357.0040.2021.0414.1645
     Firmware Date: Wed 2021-04-14
      Firmware Age: 4y 4month 3d
Gnome
Keyboard key mapping
- Ctrl, Alt, Super (Win Logo) need to be configured to properly reproduce their behaviours on Windows.
- Resources
Desktop shortcuts location
~/.local/share/applicationsor
/usr/share/applications